Overrev's RS Edition
Log in to replyHome › Forums › General › Members’ Cars › Overrev's RS Edition
- This topic has 62 replies, 7 voices, and was last updated 4 years, 3 months ago by
 stu-c.
-
AuthorPosts
-
April 28, 2019 at 9:47 AM #119010
Fitting the hardware for 375 at home and then seeking the software remap afterwards essentially makes the car “MP375” and not warranty friendly. Hence the reason the Ford route of getting it fitted at a dealer “FPM375” is more expensive but it gives you the piece of mind of the warranty. Alot of people having FPM375 done at the dealers also buy an SSC (about £30) and the dealer will normally fit it free of charge while they are fitting the uprated air recirculation valve as they are virtually next to each other.
April 29, 2019 at 6:14 AM #119038Thanks Both ,, Will get it fitted at Ford if I proceed,,
Is it really noticeable having the 375 on the car ? & does it affect your insurance Premium by much ?
Thanks Andy
May 2, 2019 at 6:25 AM #119288<span style=”-webkit-tap-highlight-color: rgba(0, 0, 0, 0);”>OverRev, great detail thanks.</span>
that Nanolex matte worked great on my roof. I did the wheels with it last month and they bead and clean up great because of the Nanolex bond.
keep it coming buddy.
go team Edition
Edition, FPM 375
May 2, 2019 at 8:31 PM #119337sparkrs – As you already know Andy, the RS is great car to drive, a real treat, the FPM 375 just sweetens the deal that bit more. For me, the FPM delivers it’s value as the revs rise and you get cracking with the overboost, for sure, I’ve noticed benefits lower in the rev range as well, but when you get on a familiar set of twisties, Mmmmm, definitely worth having, pops n bangs more as well, yep, it all adds to the experience, and you keep your warranty.
If your seriously thinking about it, but not sure, start a thread mate, see what the other guys thoughts are on the kit.
With regards to insurance, it’ll probably differ between insurers, I personally haven’t had to pay anything extra on my premium.
andy-k – Hi Andy, thanks for that mate. I am glad the Nanolex is ticking the boxes, I’ll be honest, I never thought about trying it on the wheels, I’ve got plenty left, so guess I’ll give it a try, thanks for the info.
What are using on your window rubbers Andy?, I wanted something that was rubber specific, so I’ve bit the bullet and got some Swissvax seal feed in to try, it’s a bit pricey mind at £50 odd quid for 250ml, hopefully though, it’ll do the trick.
May 2, 2019 at 9:35 PM #119341Just done my forged alloy wheels with Nanolex SI3D matte, did the callipers and black painted surface of brake hub with Feynlab Brake & Wheel coating. Gives a nice finish and will hopefully make cleaning easier. Nanolex matte products are all good I find, used to use Matte Final Finish on my forged alloys before coating, used to leave a nice finish between washes. Rust from discs comes off much easier now after coating the wheels. Great thread, glad I am not the only one who goes mad about the matte finishes. I have no matte roof but the nanolex products should do the business I would think.
May 4, 2019 at 12:55 PM #119425@Overrev ~ preparation of matt roof…, was that using products from suggested Nanolex kit?
May 5, 2019 at 8:30 PM #119520stuartditchburn – Hi Stuart, thanks for the product recommendations mate, to be fair Nanolex is a relatively new brand to me, there’s all sorts out there, the mind boggles with the options available. I reckon I might give the S13D Matte Kit a go though at some point.
Cheers again.
rog – Hi mate, prior to using the Nanolex kit, I first had to address what looked like very small specks of tree sap on the roof, a bit of a pain in the neck to be honest, as I wasn’t quite sure just what I could get away with regarding the use of different products on the wrap without spoiling the finish.
I finished up testing on a smaller area of the wrap on the tailgate by lightly moistening a makeup removal pad with a little Autoglym Intensive Tar Remover, lightly dabbing to initiate removal. In short, it worked ok, I just had to wash the roof afterwards, the roof was now ready for the kit.
Everything you need is in there, The ‘Ex’ will cleanse the wrap, enabling the best bond possible prior to applying the Spray Sealant. You maybe get about 10 pads in there, you can do it with 10, but it’s handy to get a few more in stock. Also, I found it easier to apply in slightly cooler conditions, the sealant doesn’t go off quite so quickly, thus giving you a little more time to even out the application, (as the roof is quite a large area).
Hope this helps rog.
-
This reply was modified 4 years, 5 months ago by
 Kenny.
May 5, 2019 at 10:11 PM #119529sparkrs – A little late mate, but I’ve just seen this review of the FPM375 on the tube, here’s the link, hope it works.
https://www.youtube.com/watch?v=EmqiDfVZAHg
stuartditchburn – Hi Stuart, thanks for your post mate, appreciate your product recommendations, there are so many to choose from these days. Up until last year Nanolex was a new name to me, I’ve got some of their trim rejuvenator to try, and reckon like you, that I’ll giving the s13D a go as well at some point.
rog – Prior to using the kit on the roof mate, I had to remove some contamination that looked similar to tree sap, a bit of a pain, as I wasn’t sure which products would be safe on the wrap. I finished up using some of my wifes make up removal pads with Autoglym Intensive Tar Remover, just dabbing gently to agitate/dissolve whatever it was away, in short it worked, just needed a wash off afterwards.
Once the roof was good, everything needed was in the kit. You’ll use the ‘Ex’ for the final cleanse to the surface prior to applying the Spray Sealant, this way you’ll have the best chance of a good bond, application details are included with the kit. You’ll probably get around 10 or so application pads with the kit, you can complete the job with 10, but I’d get some more in stock to be safe, as they don’t last long before they begin to shed fluff.
I found it helpful to apply the sealant in cooler conditions, in a nut shell the sealant doesn’t go off as quick, and so it buys you a bit more time to level the application, as the roof is quite a large area. Oh, and from memory, ventilation shouldn’t be overlooked!!
Hope this helps, and is of some use to you mate.
May 9, 2019 at 9:34 PM #119795Over the winter, I spent quite a bit of time thinking about what I might like from the car, unavoidably, this involves liberating the moths from my wallet, but since the RS isn’t my daily anymore, I guess that if I am going to try stuff, then now is the time.
Currently, I have two years of warranty left, so, I’ve got quite a bit left, and for now at least, I am mindful of a warranty delete due to non compliant modifications.
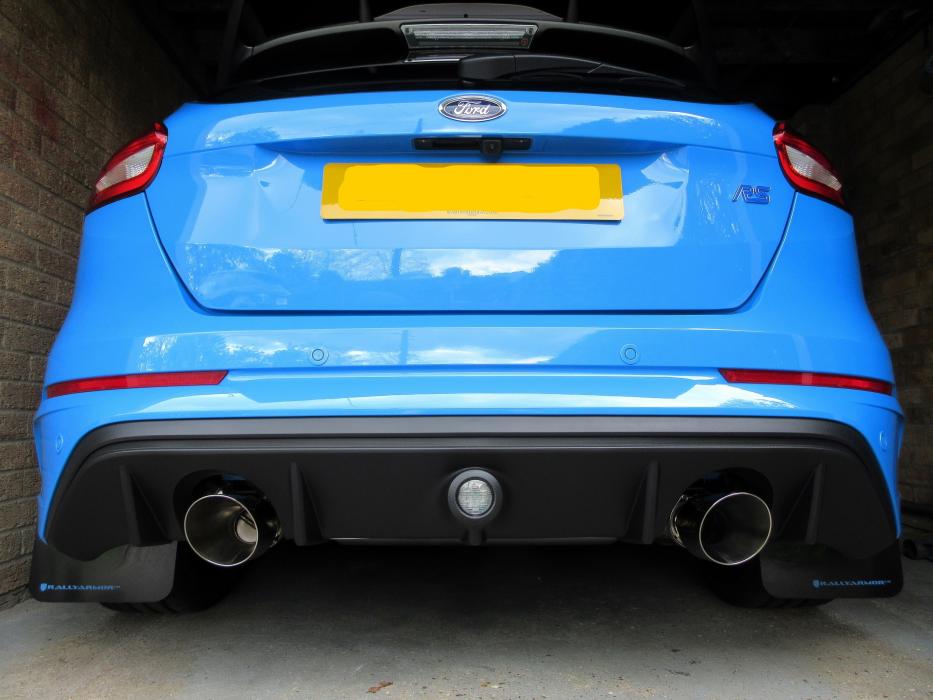
Thankfully though, the FPM375 exists, but I’ve also had a hankering for liberating a little more noise from the car, I seriously thought about the Ford Performance Cat Back exhaust, however, the Mountune V3 Cat Back came back in to stock, (and subsequently, quickly back out of stock!), a few weeks after I’d had the FPM kit fitted, I couldn’t resist, and the last of the moths in my wallet flew the nest so to speak, yep, not cheap, got to start saving again now!
Ok, to the exhaust, I just absolutely love it, cold start up on the stock pipe was always a little loud until it settled down, but this is definitely louder, once again though, like stock, it begins to settle down, and doesn’t sound too bad on low revs/throttle, it’s just that initial start up phase. If you have sensitive neighbours and are away early in the morning, this start up phase may well be their topic of conversation!
Out on the road, Oh God, I love the pipe even more, I haven’t experienced any drone yet, so all good if your cruising, but when you get playful with the right foot, and start loading up on the overboost that the FPM kindly boosted up a bit for you, well, I am already finding it addictive, never mind when your squirting in between corners sharply lifting off the gas, the pops n bangs are now at a new level from stock, well they are in Sport/Track mode anyway. Apparently, Normal mode is a little tamer in this respect, but I haven’t tried it yet, and so can’t really comment at this point.
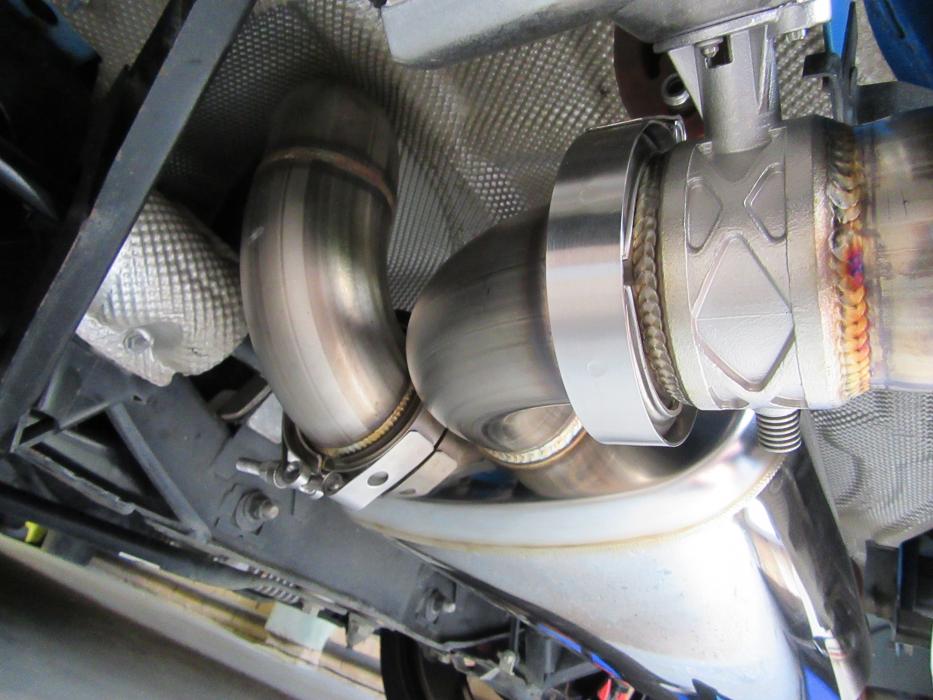
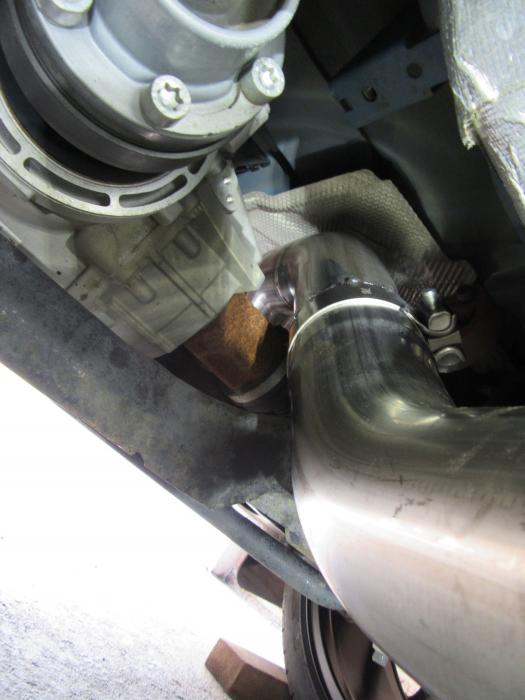
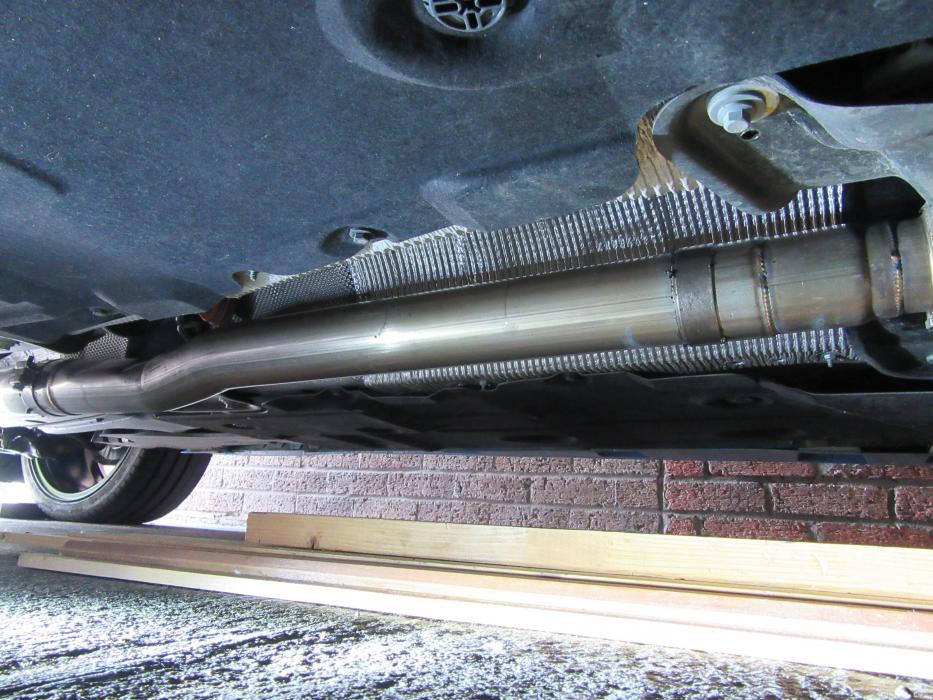
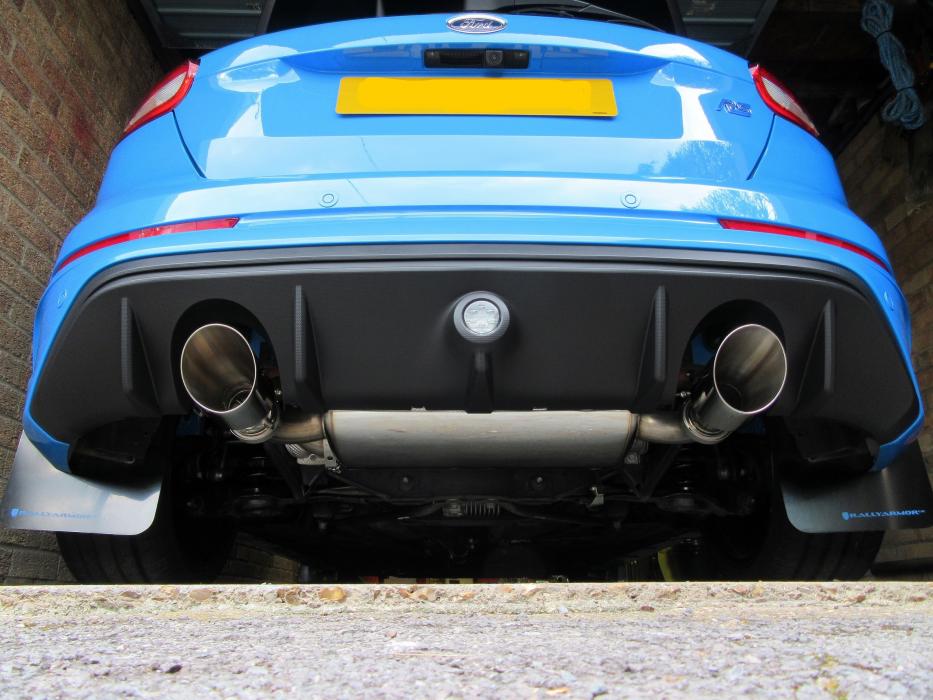
Build wise, the pipe and fittings looks good quality, the welding looks spot on as well. The silencer is quite a bit smaller than stock, from memory, I think Mountune say this Cat Back has around a ten percent weight saving over stock. Out back, the 4.5″ tips finish the look to my taste as well.
A few pics.

If you’ve lasted this long, thanks for reading!
Happy RSing folks.
May 9, 2019 at 11:13 PM #119815The exhaust looks mint. I was torn between the v3,kms or Scorpion. Your review has sold me on the v3. Ford have just completed the 375. Like you say they come into Stock at Mountune and are gone as quickly. I’ll have to check every day. Who fit it OverRev. Mountune or did you get it delivered. Thanks
May 31, 2019 at 9:27 PM #121202@overrev ~ re. matt roof and suggested Nanolex kit, thank you, your detailed reply has reinforced my belief that I must treat myself to the kit!
Looking forward to it!
Exhaust looks very smart, did you seal the chassis of your vehicle?
May 31, 2019 at 9:38 PM #121203Is the exhaust identical to the miltek or have I heard wrong? Defo on the to do list.
440bhp
443lbft
June 1, 2019 at 10:07 PM #121262Zombi2 – Firstly mate, apologies for the very late reply. Now, re the exhaust fit, I contacted the Ford dealer who installed my FPM upgrade, they then ordered the pipe and did the fit.
Matt. B – Matt, I am afraid I can’t be of any help to you here mate, I just don’t know. If any of you guys reading this know the answer though, then please feel free to chime in.
I am continuing to love the extra character that this pipe has given the car, FENG is still active, and for now I am leaving as is, love it.
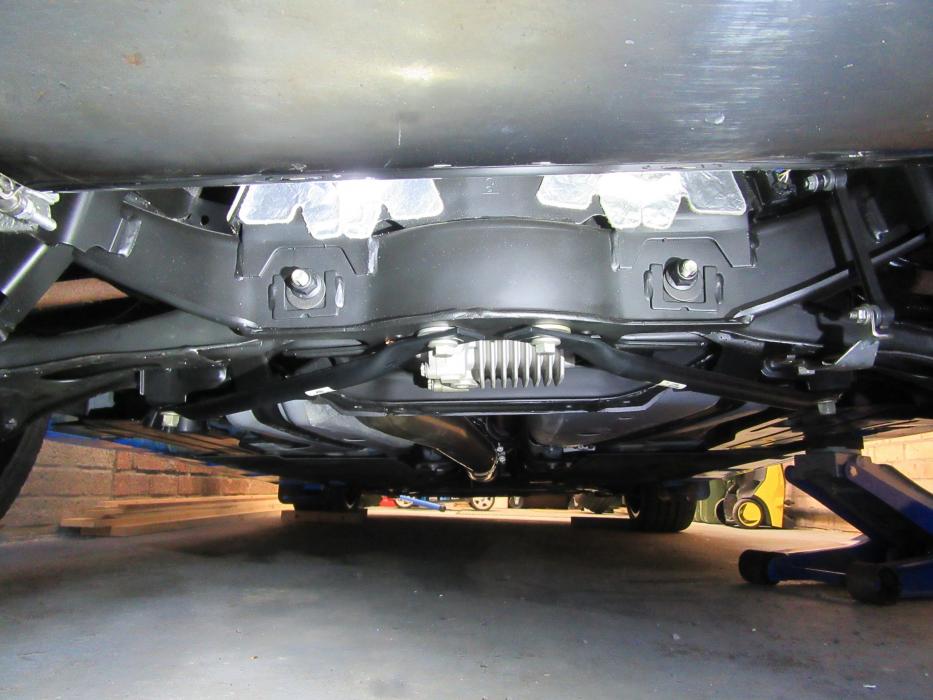
rog – Some of the photos that I took of the exhaust earlier, do show a coating to the chassis, however, I must confess that road crud was the culprit! That said, it’s funny that you should mention sealing the chassis mate, you must be a mind reader, as I’ve just finished addressing some superficial corrosion to chassis members to the rear of the car.
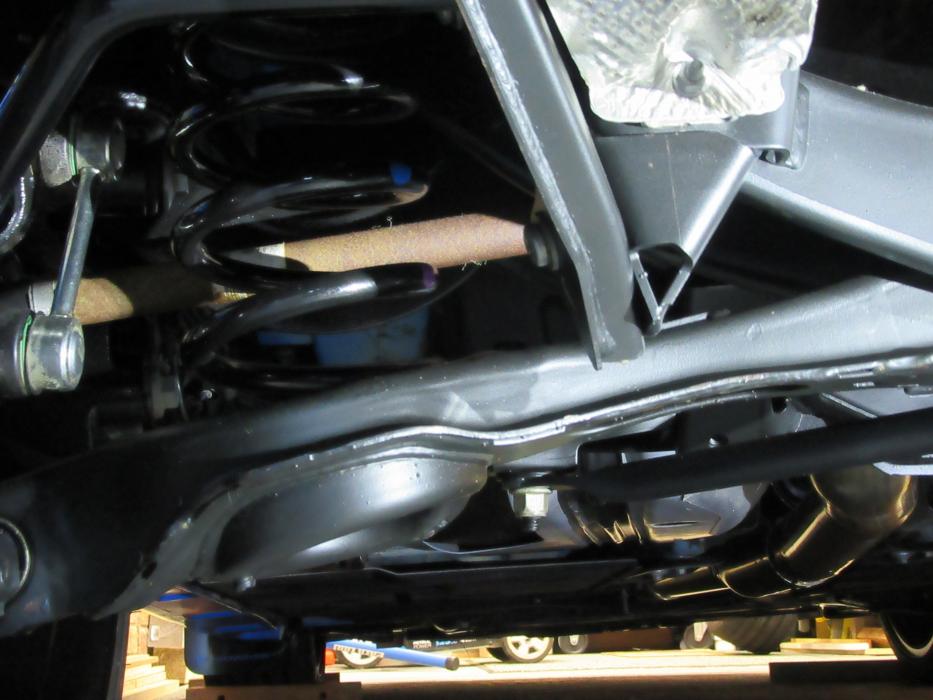
Ironically, it was while I was taking pics of the exhaust, that I became aware of the corrosion taking place, you just wouldn’t notice it without getting under the car. From what I can tell looking under my car, the corrosion seems pretty much restricted to the forward facing edge of components, seems logical I guess, these blast areas succumbing to the constant peppering from loose road debris, the worse the roads you regularly travel, obviously, the worse the effect.
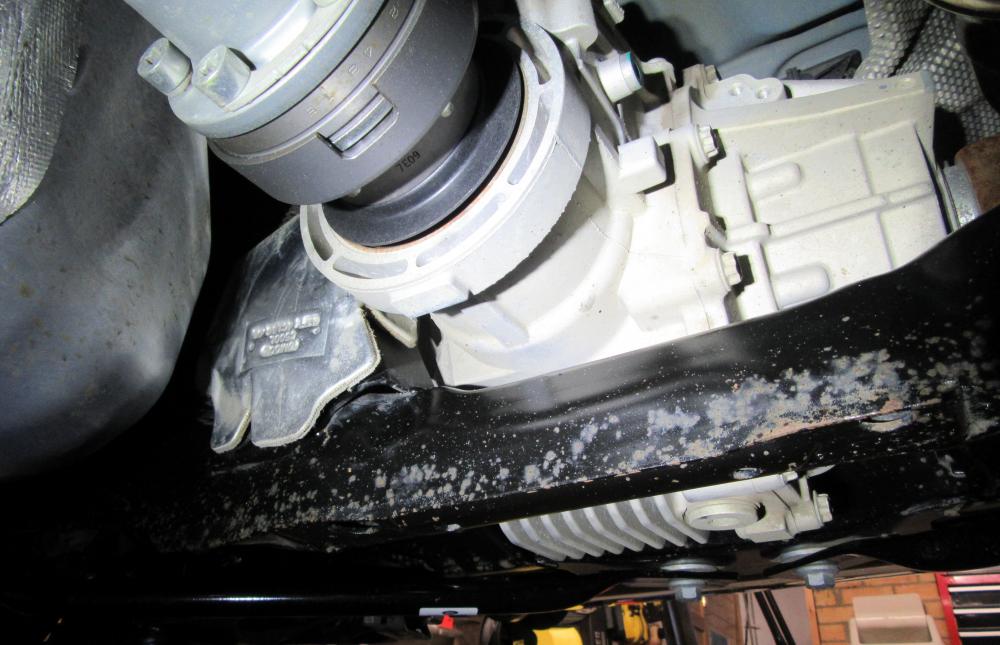
My car has circa 5700 miles on it, it was driven as a daily between March and October last year, before being laid up for the winter, coming out for a few dry runs when the weather played ball. Here are a few pics from the some of the chassis members to the rear of the car, please cut me some slack on the quality of the pics, no hoist lift here, and so I had to slide myself under the car, it was tight under there, doing the work was awkward, and taking photo’s was equally so.
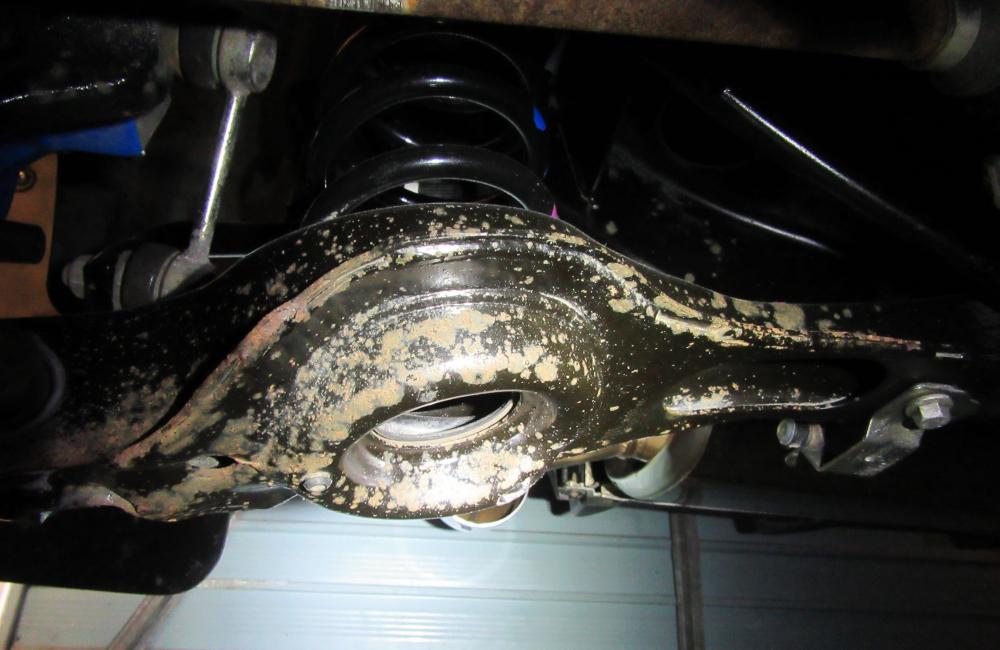
Nearside front face, cleaned off with an old microfibre and water to remove any road soiling, this is what remained once dried, aesthetically, not good, but thankfully very superficial at this point.
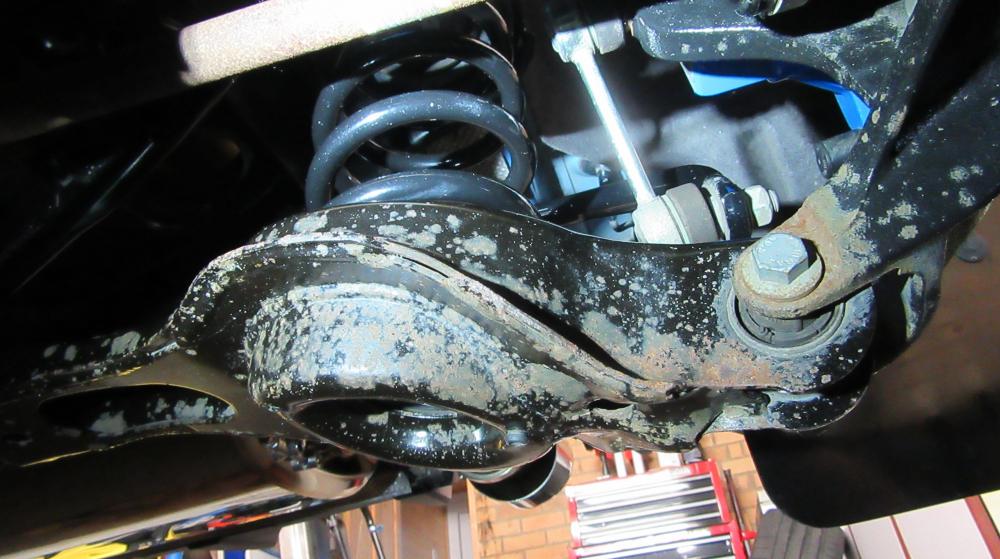
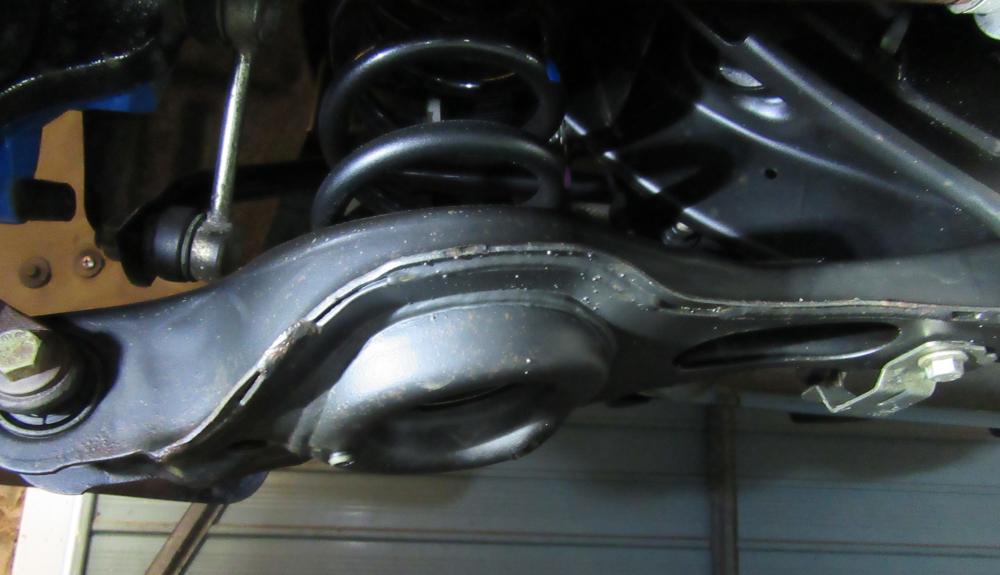
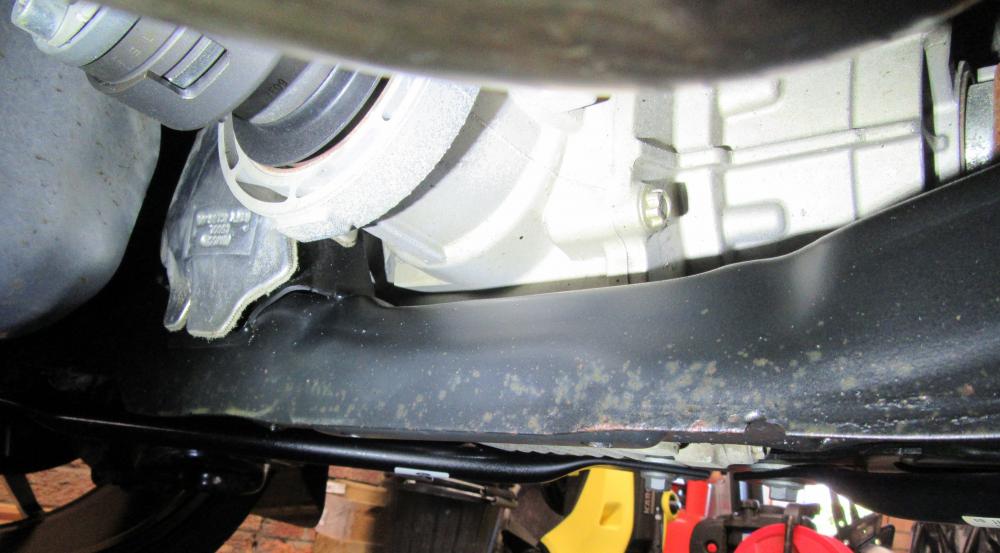
Nearside front face after cleaning off the loose rust, degreasing, and then a few coats of Bilt Hamber Dynax-UC.
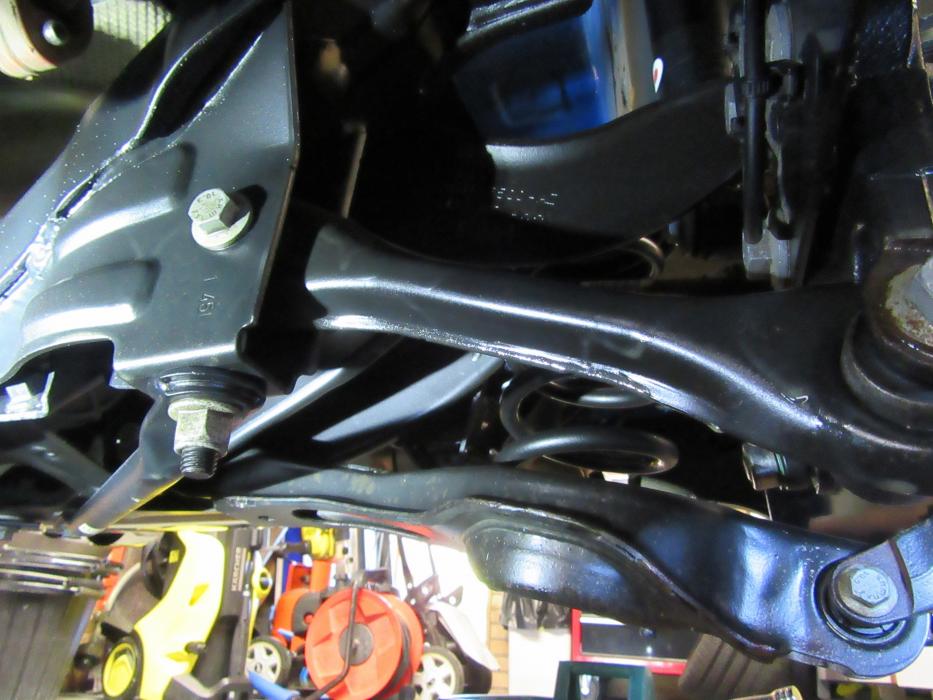
Conversely, this is the rear facing edge of the same component after a wash, as you can see, pretty good, still needs protecting though.
Once again, decontaminated, and then coated with a few coats of the Dynax-UC.
Rear Offside before.
Rear Offside after.
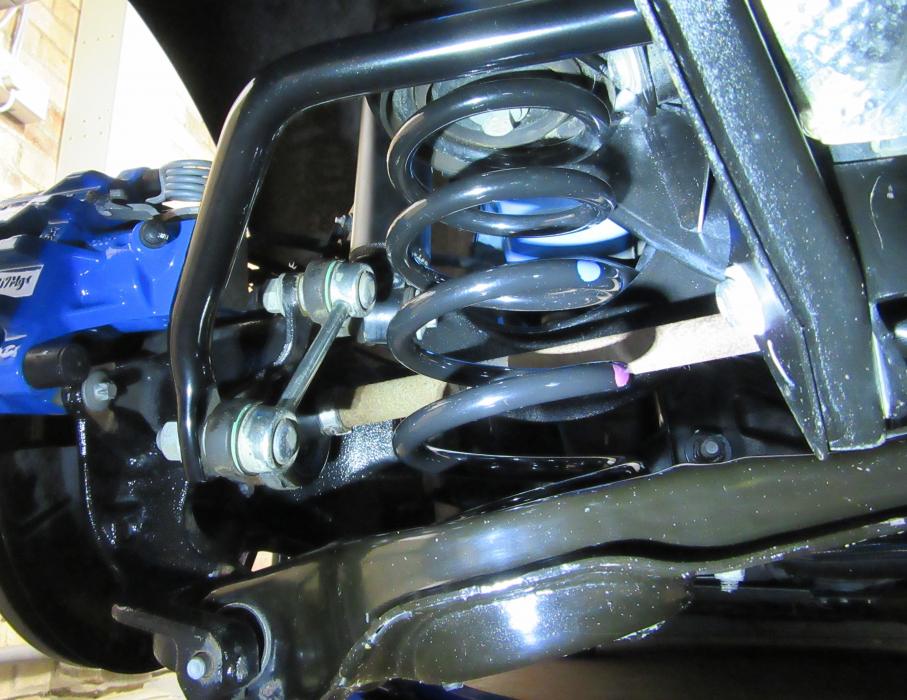
Rear facing edge of chassis was in good nick, once again decontaminated the surface, and then triple coated with wax.
Forward facing edge of chassis after a microfibre wash.
Forward facing edge of chassis after treatment. In the picture, there is a bit to the bottom edge of the chassis that I am not happy with, I’ll need to address that before I finish up.
I found the Dynax UC easy to use, I must say though, that I’d recommend an appropriate face mask, as there is a slight mist on discharge, not good breathing that stuff in.
Overall, I am glad with how it all looks now, limited access the affected areas did hinder what I was able to achieve, but at least there is some protection under there now, I guess we’ll wait and see how it all performs over the longer term.
The Bilt Hamber Dynax UC cost me around £15, and I’ve still got some left over to treat other areas of the car, so from a finance side not expensive. Time wise, I spent a few evenings laid under the car prepping the surfaces, not particularly pleasant, but not all jobs are, glad that parts done though.
Oh, and yes, it goes without saying, I did bang my head, but surprisingly not on the car……nope….on the bl..dy jack!
June 2, 2019 at 10:19 PM #121383@overrev ~ that was a good read, your workmanship is very thorough, nice one.
Did you… 1) wire brush surface rust? and 2) use any form of solvent during the microfibre wash? and 3) mask off any areas?
Every spring, my old fiesta required attention… weld seam (reapply waxoyl liberally with a brush).
June 3, 2019 at 8:59 PM #121425rog – Firstly mate, thankyou, I try to do my best, but ultimately I am a novice and still have much to learn.
1 – Yes, I did use a wire brush, but also a small wire brush wheel on my drill, while in areas where these were not suitable to use, I used some 120 grit Wet and Dry paper to help level the corrosion, which thankfully was still at a superficial stage.
2 – With regards to the Microfibre wash, at this stage I was only intending to remove road dirt in order to be able to properly inspect the condition of surfaces, thus, I hadn’t used solvents at this point. At this stage, I had three or four old microfibres, and a couple of buckets on the go, one, a bucket of water with a little detergent mixed in, the other a rinse bucket.
It wasn’t until after I was happy with the corrosion levelling that I set about thoroughly cleansing the surfaces, the Bilt Hamber ‘How to Use’ guide for the Dynax UC suggests using White Spirits or something similar as final prep prior to product application, this is what I used.
3 – With regards to the masking of areas, I didn’t do an awful lot if I am being honest, I seemed to spend more time trying to get at just the right angle to parts concerned, and then taking my time with the application of the wax, in fairness, the nozzle on the can is pretty accurate and discharges at a comfortable rate to work with, that said, I did have a towels wrapped around the brake areas though just to be safe.
-
This reply was modified 4 years, 5 months ago by
-
AuthorPosts